Assignments
Project 1 - Magnetic Poetry App
Project 1
Goal: To build a Magnetic Poetry App.
Requirements
- Each partner individually completes the Dr Magneto Exercise and posts it to mycourses (due Wednesday 2/8)
- Get a partner and post your names to the discussion thread. (due start of class, Thursday 2/16)
- Required App Features for Checkpoint #1 (due Tuesday 2/21 - start of class):
- This is worth 10% of Project 1 grade
- For this first deliverable, make sure that both partners do (or attempt) ALL of the coding requirements.
- The app is universal and runs on both iPhone and iPad. (-2% if not done)
- The app uses Xcode 8.2/Swift 3/iOS 10.2 (-2% if not done)
- The app will start up with a set of related words on the screen - see mycourses for word sets, or come up with your own. (-2% if not done)
- The words are draggable. (-2% if not done)
- At startup, the word magnets will be neatly grouped near the top of the screen. Write code that places the magnets in rows, and puts space between words and the rows. To do this you will need to access the width and height of the magnets (labels) so that you know how tall to make your rows, and when you've run out of room on a row.
All word labels will have exactly the same height which is
label.frame.size.height, and differing widths which islabel.frame.size.width (-3% if not done)
Tip: This might be a little tricky for you. Both partners should first attempt to do this by themselves. Ideally if you both get it working, you can submit the "best" solution. - The Dr Magneto word magnets are too small, especially the ones with a single character. Solution: Add a space to boths of the ends of each label's text, then center align the text in the label. (-3% if not done)
- The app has a custom App icon - designed and created by you - for all iPad and iPhone sizes. Here is a tutorial on how to create an app icon. If you already have an image file you think could work as your icon (at least 1024x1024 pixels ideally), services like http://appicon.build will generate all of the required icon sizes for you.(-3% if not done)
- Create a start up screen (on LaunchScreen.storyboard) that has the name of your app and your team members on it. Use an image (drag out a
UIImageView), use auto-resizing or auto-layout to position it, and make sure it looks good on both iPhone and iPad. (-3% if not done) - BOTH partners bring the app to class installed on their iOS hardware (-3% if not done)
- Required App Features for Checkpoint #2 (due Monday night 2/27) - This is worth 10% of Project 1 grade
- The user can load at least 3 distinct sets of words. (see the Tables I-III Walkthrough for ideas on how to let the user choose something from a list). Because multiple view controllers will depend on the same data, ideally you have that data stored in just one place. Also, use some emojis if you like - http://getemoji.com & http://emojipedia.org - (-6 if not done)
- Before loading a new word set the app needs to get rid of all of the old
UILabels. See this Stack Overflow post on how to do this. (-3 if not done) - When new word sets are loaded, make sure that the words are not too close to the top or edges of the screen for the user to tap. Test for this fact on a real device. (-2 if not done)
- Hide the status bar - you can do this on the main settings page for the app (-2 if not done)
- Make sure your app name matches the name on the icon - see developer.apple.com - Updating the Display Name of Your App (-2 if not done)
- Get rid of all compiler warnings - including those for unused variables, missing icons, and broken Storyboard constraints (-1 per compiler warning)
- Make sure you still meet all of the checkpoint #1 requirements (-1 per requirement not met)
- Required Final App Features (due Sunday night 3/26) - no late submissions will be accepted - bring to class on your device the next day:
- The app should by now been thoroughly tested on iOS hardware:
- The app should display properly on either landscape or portrait orientation, and on both iPhone and iPad. I recommend choosing one orientation for the app, either portrait or landscape, and making that the sole orientation of the app.
- There should be no obvious usability issues.
- State Preservation. The user's current chosen category will be stored in
UserDefaults, and the chosen word set will be displayed in when they launch the app. - Use a larger font size when creating word magnets for an iPad. You can either: look at the width of the screen (do a google search on how to get the width of the screen) and base the font size on that value, or check to see the device's "user interface idiom" - see this Stack Overflow post: http://stackoverflow.com/questions/24059327/detect-current-device-with-ui-user-interface-idiom-in-swift Be sure that the words can still fit on the smallest iPhone screens (the iPhone 5/iPhone SE)
- The user can share their poetry (a screenshot of the entire poem) with others using Social Networks with the
UIActivityViewControllerclass. - The user can choose a poetry background image from their Photo Library with the
UIImagePickerControllerclass. - The app meets all requirements of checkpoints #1 and #2 (-5% per requirement not met)
- Because multiple view controllers will depend on the same data, you have a Singleton model class that manages/contains your application data.
- Code Conventions
- Class names are capitalized, instance variables begin in lowercase (-1 per incidence)
- Code files in the Xcode Project Navigator are organized in groups for example, VC, Model, Lib, Helpers, Extensions etc...(-5 if not done)
- Get rid of all compiler warnings - including those for unused variables, missing icons, and broken Storyboard constraints (-1 per compiler warning)
- Use
//MARK: - Some Category -in your view controller classes to organize your code. Possible categories includeivars,Private Helper Methods,Storyboard Action Methods,Initialization,View Lifecycle,GestureRecognizer Action Methods,UIImagePickerController Delegate Methods, and so on. - If the app crashes, there will be an additional penalty of -10%
- The app should by now been thoroughly tested on iOS hardware:
- Extra Features:
- Doing all of the above gets an 85% - to get a higher grade you need to go "above and beyond". Be sure to document your extras in a seperate file or in the comments field of the dropbox. If you don't, you will not get credit for them. Here are some ideas:
- Add Word to existing word set/Make new word set
- Delete Words, and animate it - look at Hello RIT-2
- Rotate words - see GestureRecognizer Demo in mycourses
- Custom Fonts - use a
UIPickerView- see this tutorial - http://codewithchris.com/uipickerview-example - Slider for Font Size - use a
UISlidersee this tutorial - http://sourcefreeze.com/ios-slider-uislider-example-using-swift - UI Animation - go back and look at Hello RIT-2
- If the app force-quits, the user's last poem should be preserved, the previous background image will be restored, and all of the word magnets should be in the same location.
- ... you decide!!! ...
- Doing all of the above gets an 85% - to get a higher grade you need to go "above and beyond". Be sure to document your extras in a seperate file or in the comments field of the dropbox. If you don't, you will not get credit for them. Here are some ideas:
Handy Links
- Some examples of previous Magnet projects and best practices are here: Project-1-comments.pdf
- magneticpoetry.com
- Lovecraftian Letters
- getemoji.com
- emojipedia.org
- nshipster.com - UIActivityViewController
- developer.apple.com - UIActivityViewController
- developer.apple.com - UIActivity
Code Hints
Hint #1
The easiest way to add spaces to your magnets is to do so right after you create the label - and to use string interpolation like so in your label creation loop:
label.text = " \(word) "
Hint #2
Animating your magnets when they first appear on the screen or when a word category is changed is a nice effect. Below is code that I have running in my placeWords() method - in the loop that creates the magnets.
All of the words are initially placed at random location on the screen, with 0.5 opacity, and then moved to their proper calculated position in the animations: block below:
(The center variable is each word's proper ending position.)
// adapted from "Hello RIT II" ICE
UIView.animate(withDuration: 1.0,
    delay: 0.0,
    options: UIViewAnimationOptions.curveEaseInOut,
    animations: {
       l.layer.opacity = 1.0
       l.center = center
    },
    completion: nil
 )
Hint #3
Hint #2 above works well when the magnet view first loads, and works fine on an iPad, but if you change the word category on an iPhone, and then return to the main magnet screen, the category has changed but the animation never happens.
I found a work around that uses the Grand Central Dispatch API (which we have not covered) to fire the animation 10 milliseconds after the words are added to the screen.
let fireTime = DispatchTime.now() + .milliseconds(10)
DispatchQueue.main.asyncAfter(deadline: fireTime){
    // UIView.animate() code goes here
     print("code will fire in 10 milliseconds)
} // trailing closure syntax!
Hint #4
Sick of everything in your app being gray?
UIAppearance is a protocol on many UIKit classes that allows you to change the styling of UI elements for either your entire app, or just for for specific elements. See Using UIAppearance PDF in week 8.
Hint #5
See the UIInterpolatingMotionEffect Notes PDF in week 8 of my courses to see how to add "kinetic realism" to your app. Put the effect on each word when you add them to the scene, and make the effect subtle.
Hint #6
When doing the final testing your app, be sure to delete it off of the simulator and your iOS device, reinstall it, and be sure that it works in the "first run" state.
This is necessary to do so that you can be 100% sure that your UserDefaults code is properly written.
Screenshots
Checkpoint 1
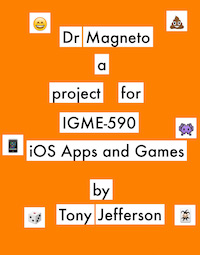
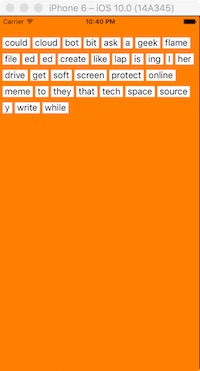
Checkpoint 2
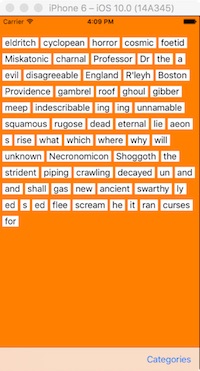
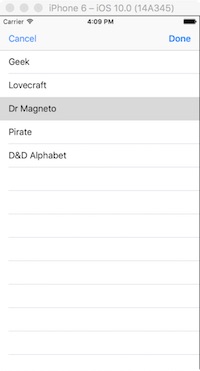
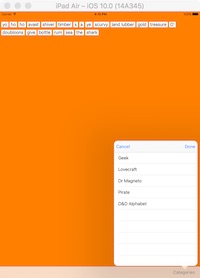
Final Deliverable
Project 2 - State Parks
Project 2
Goal: Finish Up the State Parks App.
Requirements
- This is a solo project without a partner, you work alone, by yourself, unus.
- You must complete the following exercises:
- ParkFinder I ICE
- ParkFinder II ICE
- ParkFinder III ICE
- File System ICE
- Bookmarker I ICE
- Bookmarker II - NSCoding ICE
- Required Final App Features:
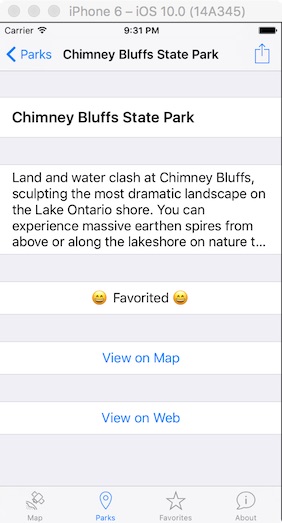
- (15 points) The app will have all of the functionality from ParkFinder Parts I-III, and the the parks in
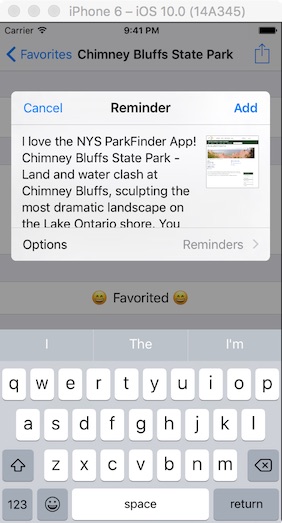
ParksTableVCwill be in alphabetical order. - (10 points) There will be a "Share" button in
ParkDetailTableVC.swiftthat the user can tap. This causes the park to be shared with others using a social service. (If you have forgotten how to do this, see Social Counter ICE) - (10 points) There will be a "View on Web" button in
ParkDetailTableVC.swiftthat the user can tap. This causes the park to be viewed in the Mobile Safari app. You will have to add aurlproperty toStatePark. This site - http://nysparks.com/parks/ - has a unique web page for every park - so get the URL values from here. - (3 points) The tapping the Favorite button of
ParkDetailTableVC.swiftwill add theStateParkto afavoritesarray in theParkData.swiftsingleton. - (10 points) The contents of the
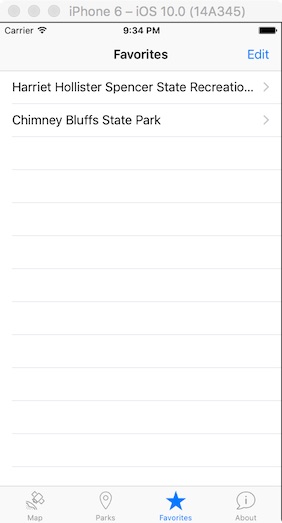
favoritesarray will be displayed in the Favorites tab by aFavoritesTableVC.swiftclass - (10 points) There will be controls on
FavoritesTableVC.swifttab where the user can re-arrange and delete the state parks. - (20 points) The
StateParkclass will conform to theNSCodingprotocol. The contents of thefavoritesarray will be serialized and saved to disk, and then loaded in whenever the app starts up. (This is covered in the Bookmarker II ICE) - (3 points) Improve your data set by adding at least 3 state parks to it (for a total of 15 parks), and be sure to have a short
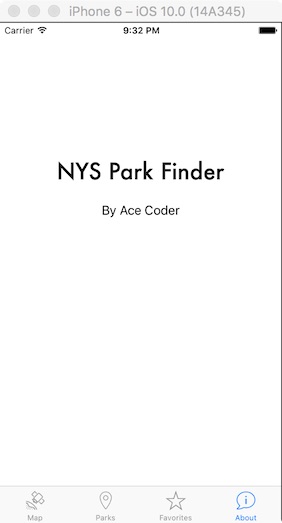
parkDescriptionof each park in your data. Get parks and better descriptions from this site - http://nysparks.com/parks/ - (3 points) The About screen will display your name and the name of the app.
- (3 points) The app will have a custom launch screen that displays your name, and the name of app.
- (3 points) The app will have custom app icons in all of the required sizes.
- (Deductions: up to -10 points if not done) The app will function on both iPhone and iPad, in both landscape and portrait orientation.
- (Deductions from grade if not done) Code Conventions:
- No compile-time or run-time errors or warnings
- Code comments
//MARK:for organization- Upper-case class names, lower case ivar and method names
- MVC and appropriate use of design patterns
- Prefer class extensions over global functions
- Singleton data management class
- Separation of Concern - You must have multiple Swift classes, with each class having well-defined functionality accessed through a public interface.
- D.R.Y. - Don't Repeat Yourself. Repeated blocks of nearly identical code should be factored out and placed in a separate method.
- (15 points) The app will have all of the functionality from ParkFinder Parts I-III, and the the parks in
- The above done well gets you to a 90%. Possible extra features to get the grade higher include (Max Grade 110%):
ParkDetailTableVC: format the StatePark nicely by using an image in the table cellParkDetailTableVC: make theparkDescriptionfit in its table cell by creating a custom table cell and using auto-resizing. See this article for ideas on how to do this - http://candycode.io/automatically-resizing-uitableviewcells-with-dynamic-text-height-using-auto-layout/MapVCideas: aUISegmentedControlto change map types, customized map annotations, map overlays, show current user location and zoom map to that location.ParkDetailTableVCandStateParkideas: Logic that ensures a StatePark is favorited only once. (+5 points)ParkDataidea: make theparksandfavoritesivarsprivate, and then write a public interface (methods) to access and modify their contents. Examples:addToParks(park:StatePark)andpark(atIndex:Int)to access them.- Something else we haven't done in class, like overloading
==or<or>in theStateParkclass - see these articles for ideas: http://www.codingexplorer.com/swift-operator-overloading and http://www.raywenderlich.com/80818/operator-overloading-in-swift-tutorial - Use
CLLocationManagerto order the parks inParksTableVCby distance from the user.
- Other:
- -10% off of final project grade (at least) if the app crashes during use.
Hints
viewDidLoad()is only called once, the first time a ViewController is loaded. To get your favorites to show inFavoritesTableVC, you will have to reload the table every time "the view appears" i.e. whenever the user switches to the tab. Use the google to find out how to do this.- When you unarchive
StatePark, thelatitudeandlongitudeivars will be saved as floating point values - uselatitude = aDecoder.decodeFloat(forKey: "latitude") - You might want to center the map on the center of the state (which is roughly Utica,NY) and use a larger map region.
- Here is a handy site for looking up the coordinates of cities and other locations - www.distancesto.com/
- You can sort
StateParkon itsnameproperty, but you have to make that propertypublicfirst.
Screenshots
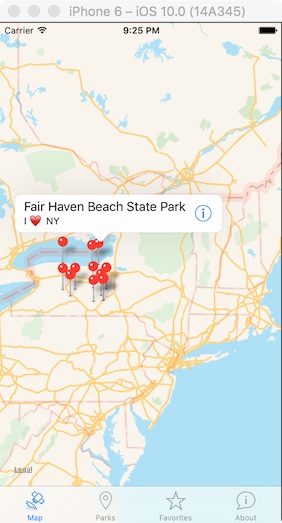
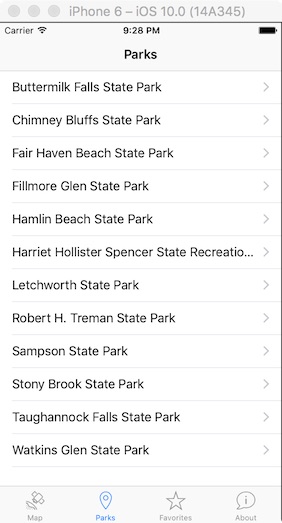
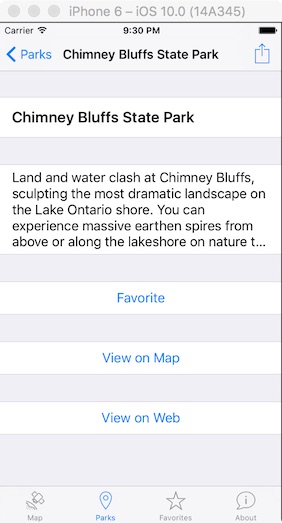
Project 3 - Final iOS App of Awesomeness
Project 3
Goal: To build your App of Awesomeness
#0 Overview
Create a useful or entertaining iOS app or game in teams of 1 to 2 students (3 requires prior approval). The app should be "App Store ready" (or nearly so). The target hardware can be iPhone or iPad (or Universal). Previous submissions have included:
- Apps that utilize web services to display data: Traffic App, Woot Ware, Starting Five (Dribble.com client), USGS Earthquake Mapper, iGas-Station, Philly Arts Today, Grubulate (recipe finder), Aimless Reader (random articles), Local News (in App Store)
- Entertainment: BackAppYa (comeback generator), Beer of the Day, Lionfish Hunter, Sudoku, Star Trader, Rate Your Boys, They all look the same to me, Jetpack Joyride Clone
- Utilities: S.P.A. - Shotgun Pattern Analyzer (used OpenCV), Veg Nut (recipe Finder), Diablo 3 Skill Calculator, MyIndia, Nihongo Study (Japanese Language App), Garbage Plate Finder (in App Store), Fitness App, Split the Bill
- Media Apps: Audio Streamer, Manga Reader
- RIT Themed: iRIT/RIT Now (in App Store), RIT Student Government, RIT Virtual Tour, RIT Taxi, Wallace Library App, RIT Room Booker, RIT Bus, TigerSafe (in App Store, never a student of mine)
- Games!
- Won't get in the App Store: Wifi'r (used private API)
- Apps that would have to run on a jailbroken device ARE NOT ALLOWED
- Would it get in the App store? is the question your app should answer in the affirmative.
#1 - Create an Application Definition Statement
An Application Definition Statement is a one or two line statement answering these two questions: What's the app do? and Who is it for?
#2 - Proposal
Using your Application Definition Statement as a starting point, put together the following:
- Full list of features - Brainstorm a full list of features that could possibly be implemented by the application. Even though we would never think of building such an App, think "Kitchen sink" or "Word on iPhone" as you are creating your list of features.
- Filtered list of features - Distill these features down to only the most essential ones that allow the application to fulfill its Product Definition Statement. Apple's Mantra: Pick the few features, most frequently used, by the majority of your users, most appropriate for the mobile context.
- Do a competitive analysis - Discover your competition at least 3 existing iPhone Apps in the App Store that are similar to what you want to create. Also look for one similar Android App in the Android app markets. Read the descriptions in the App store, and download the apps if they are free. Write a quick review of each App: include its features, user rating, its strengths and weaknesses relative to its competition, and what features you feel its missing.
- Iterate - head back to steps A and B - did you leave anything out? Are there features you should add or remove? Update your document.
- Sketch out the UI - Describe the UI, and produce some mock-ups. These can be drawn by hand or created in Photoshop or Storyboard it. Tip: The OS X Grab utility can grab some or all of the screen.
- Deliverable - Put the above in a PDF and post it to mycourses.
- Be ready to discuss your idea in class
#3 - Prototypes(2)
Getting a prototype up an running as fast as possible is critical.
- Put together the primary navigation of the App in Storyboard, and find at least 5 people to try the app on actual hardware. Use the knowledge gained to add critical features, and fix navigation issues.
- Install on iOS hardware and bring to class on due date
#4 - Final Deliverable Requirements
- Meets the Application Definition Statement - an "A-level" app is a "polished solution to a well defined problem".
- A polished User Experience that respects the iOS Mobile HIG, as well as iOS 7/8/9/10 Design Principles:
- Clarity - it should be clear what the app does, and people should be able to use it without instruction.
- Deference - content is front and center - the UI should fade into the background.
- Depth - it should be a vibrant and life-like experience, and people should not get "lost" or be confused about what state the app is in.
- Uses Frameworks and/or methods of those frameworks that go well beyond what we've done in class this semester.
- Meets course coding standards (see below)
- Install on iOS hardware and bring to class on due date
Coding Standards
- Design Patterns: MVC, Singletons, Delegation, Notifications
- Separation of Concern - You should have multiple classes, with each class having well-defined functionality accessed through a public interface.
- D.R.Y. - Don't Repeat Yourself. Repeated blocks of nearly identical code should be factored out and placed in a separate method.
- No "magic numbers" (unnamed numerical constants) - declare constants or enums or structs instead.
- Code conventions: follow principle of least privilege, class names are capitalized, method names are in lower case.
- Avoid global variables.
- Well commented code. Each and every method you wrote gets a comment indicating what it does.
- There will be no compiler warnings, and no run time errors.
#5 - Documentation
- Requirements:
- Document that you met your application definition statement, and be specific about any work you did that truly went above and beyond.
- Discuss any struggles or failures in the development process.
- Describe which team member worked on what part of the project.
- Give credit for resources like images and sounds, and any software libraries or tutorials you used. Be sure to give yourself credit for graphics you created, or any code solutions you spent extra time on.
- Grade yourself (0-100) and justify it. Put this in a text file or Word document or PDF and submit it with your project.
- -10% if not done
Grade Rubric
- Good (Meet all requirements above reasonably well) = 90%
- Better (Go beyond expectations) = 95%
- Best (Go significantly beyond expectations) = 100%
- Wow! = 101%+
Deductions
- (-35%) The project won't compile. (Be sure that your resources have been imported and are in your project directory!)
- (-10% to -30%) The app crashes.
- (-20%) The completed project is not installed on your iOS device.
- (-??%) Egregious violations of MVC or Coding Standards
Milestones
- Team member name(s), idea, and proposal due start of class Tuesday 4/25 (week 13) - post to mycourses dropbox. 15% deduction from final project 3 grade if not done.
- Working Prototype #1 due start of class Tuesday 5/2 (week 14) - post to mycourses dropbox - install on iOS hardware and bring to class. 15% of off your final project 3 grade if not done.
- Working Prototype #2 due start of class Tuesday 5/9 (week 15) - post to mycourses dropbox - install on iOS hardware and bring to class. 15% deduction from final project 3 grade if not done.
- Final Version Due Finals Week during the scheduled final exam time (Tuesday 5/16 @ 10:15AM) - post to mycourses dropbox with your documentation - install on iOS hardware and bring to class. Late submissions will not be accepted.
- ** If you borrowed an iOS device from IGM, you must return it at the time of our final meeting - and don't forget the cable. **
*** Resources ***
We've just scratched the surface of iOS this semester - you are encouraged to explore other frameworks and capabilities of iOS.
- Look over this list of iOS frameworks
- http://www.raywenderlich.com has many written tutorials and a few video tutorials.